Settings · Business
Service Areas
Service Areas are named sets of ZIP codes (US) or postal codes (Canada). They decide which customers you can serve and where your AI assistant will book.
Quick Answer - 30 Seconds
To add an area: Account settings → Business → Service Areas → Add Service Area → type a name → type a city and press TAB (or paste ZIP codes) → Done.
Leads that were turned away for being outside your areas are re-checked automatically once you add coverage.
What this controls
- Who gets booked. A customer whose service address falls outside every area is marked outside service area and is not booked. Your AI assistant and the web scheduler tell the customer you don't serve that address.
- Which services apply where. On Services a service can cover all areas or only some.
- Nothing in your field service software. Areas live in OnePath only.
If you connect field service software, its service areas are pulled in when you connect, when you click Sync data on Integrations, and nightly. Only new ZIP codes are added; areas you built here are never removed.
Where to find it
Location: Account settings → Business → Service Areas
→ app.onepath.ai/settings/account/service_areas
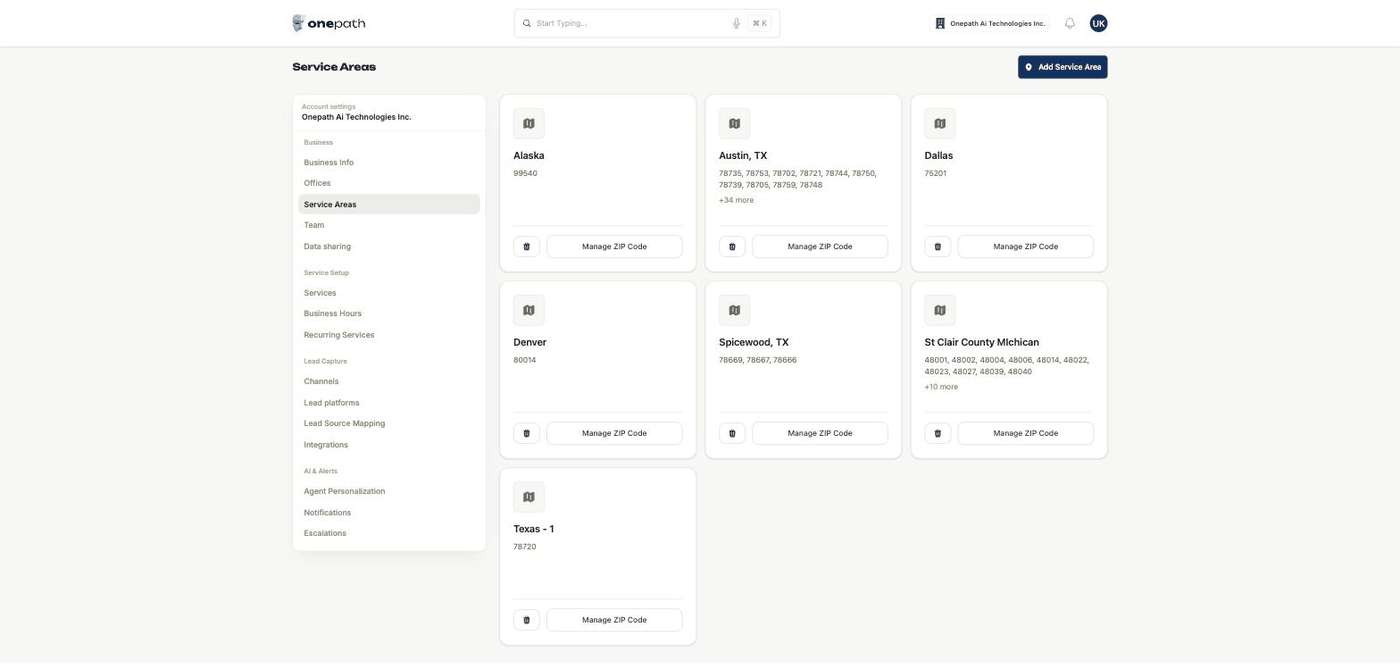
The list
Each area is a card: its name, the first ten codes, and +N more if there are more. Wildcards are hidden, so 78613-**** shows as 78613.
- Manage ZIP Code (or Manage Postal Code for Canadian accounts) opens the editor.
- Delete (trash) asks "Are you sure you want to delete <name>?". Confirm with Delete. This cannot be undone.
No areas yet? You see "No Service Areas Yet" with an Add Service Area button.
Adding or editing an area
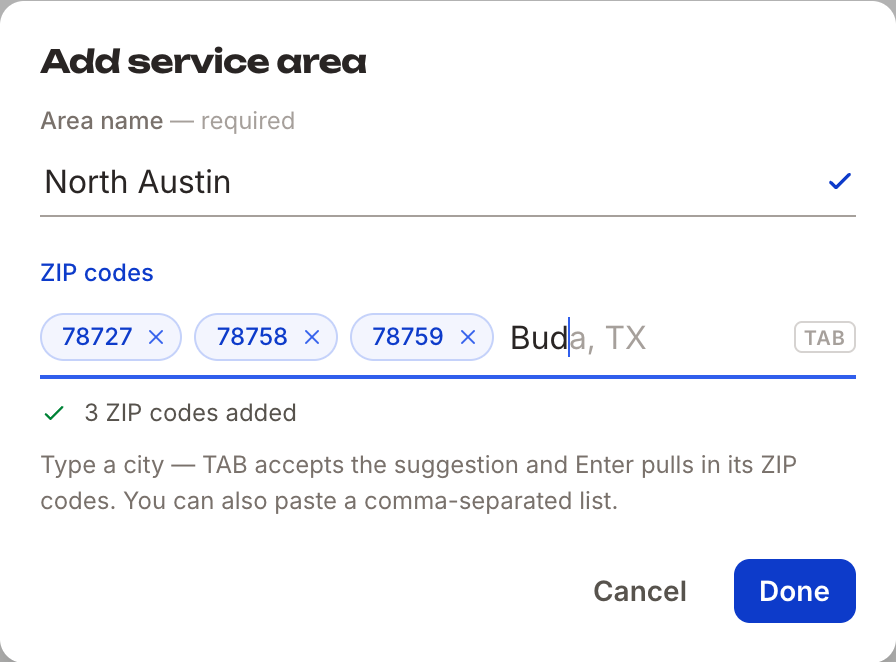
The Add service area / Edit service area window has two fields:
Service area name — required and unique on your account, for example Austin, TX or Toronto, ON.
ZIP codes (or Postal codes) — a list of chips plus one box labelled City or ZIP. Three ways to fill it:
- Type a city and press TAB to accept the suggestion. Every ZIP in that city is added: "<City> → N zip codes added".
- Type a single code. It becomes a chip.
- Paste a comma-separated list. Recognised codes become chips; anything else stays in the box: "N entries not recognized — left in the field".
Click Done. You see "Service area created successfully" or "Service area updated successfully".
Accepted formats
| Country | Format | What it covers |
|---|---|---|
| US | 12345 | Every address in that 5-digit ZIP (stored as 12345-****) |
| US | 12345-6789 | Only that ZIP+4 |
| Canada | M5V | The whole forward sortation area (stored as M5V ***) |
| Canada | M5V 3C6 or M5V3C6 | Only that postal code |
Your account's country (from its address) decides which format is accepted. Only the US and Canada are supported. A wrong entry shows "That doesn't look like a US zip — use 12345 or 12345-6789" or the Canadian equivalent. A city whose codes are all in the area already shows "<City> — all of its zip codes are already in this area".
What "outside service area" means
- The customer's lead is disqualified with the reason unserved area, and any open request on it is disqualified too.
- Add an area that covers that ZIP and OnePath re-qualifies those leads on its own; you don't need to find them.
- Nothing is deleted. The customer and the conversation stay in Customers and Interactions.
Quick Tips
- ✅ Start with cities, then trim - TAB pulls in every ZIP; remove the chips you don't serve.
- ✅ Use 5-digit ZIPs - a plain ZIP covers every ZIP+4 inside it; only use ZIP+4 to carve out a slice.
- ✅ One area per region - lets you scope services to areas later.
- ❌ Don't delete an area to "clean up" - it cannot be undone, and services scoped to it lose that coverage.
Still stuck?
Reach out in your OnePath Slack channel or email your account manager. Include the ZIP code and the message you saw so we can help fast.